
Outdoor drains might seem like minor fixtures, but they play a huge role in protecting your home from water damage. Most homeowners never realize that just a single clogged drain can lead to thousands of dollars in repairs after a heavy rain. The surprising part is how quickly a little debris turns into a big headache. Regular maintenance does more than keep water flowing. It’s the difference between a dry, safe house and an unexpected disaster right on your doorstep.
Table of Contents
- Step 1: Inspect Your Outdoor Drains for Blockages
- Step 2: Clear Debris and Clean the Drainage Area
- Step 3: Assess and Repair Visible Damage
- Step 4: Test Drainage Efficiency After Maintenance
- Step 5: Establish a Routine Maintenance Schedule
Quick Summary
| Key Point | Explanation |
|---|---|
| 1. Inspect drains for blockages regularly | Conduct a thorough visual inspection of outdoor drains to catch obstructions early, avoiding costly repairs later. |
| 2. Clear debris to maintain flow | Remove leaves and organic materials from drainage areas to prevent water accumulation and ensure efficient drainage. |
| 3. Assess and document visible damage | Check for cracks or deterioration and document findings for reference when consulting professionals or planning repairs. |
| 4. Test drainage efficiency after maintenance | Use a garden hose to simulate rainfall and ensure water flows smoothly through drains, indicating effective maintenance. |
| 5. Establish a seasonal maintenance schedule | Create a maintenance calendar that aligns with seasonal changes to ensure regular checks and timely interventions. |
Step 1: Inspect Your Outdoor Drains for Blockages
Knowing how to inspect your outdoor drains for blockages is the foundational first step in preventing potential water damage and drainage issues around your property. A comprehensive drain inspection can help you identify potential problems before they escalate into costly repairs. Homeowners should approach this task systematically and with careful attention to detail.
Visual Inspection Techniques
Begin by walking around your property and examining all exterior drainage points carefully. Look for visible signs of blockage such as standing water, slow drainage, or accumulated debris near drain openings. Pay special attention to areas around gutters, downspouts, and ground-level drainage systems. Leaves, twigs, grass clippings, and other organic materials often collect in these spaces and can quickly create significant obstructions.
Carry a flashlight during your inspection to help illuminate darker areas and reveal potential blockages that might not be immediately apparent. Use a sturdy stick or specialized drain inspection tool to gently probe areas where debris seems concentrated. Never insert your hands directly into drain openings as this could expose you to potential injury or unseen hazards.
Drainage Performance Assessment
To thoroughly assess your drainage system’s performance, conduct a simple water flow test. Use a garden hose to simulate rainfall conditions and observe how water moves through your exterior drains. Watch for warning signs such as water pooling instead of quickly flowing away, unusual gurgling sounds, or backups that indicate potential underground blockages. If water seems to move sluggishly or not at all, you may be dealing with a more significant drainage issue that requires professional attention.
For more detailed insights into your home’s drainage systems, explore our comprehensive drain guide that can help you understand the intricacies of your specific drainage setup.
Remember that early detection through regular inspections can save you significant time and money in potential repair costs. When in doubt about the severity of a potential blockage, consult a professional plumbing service to perform a more thorough assessment.
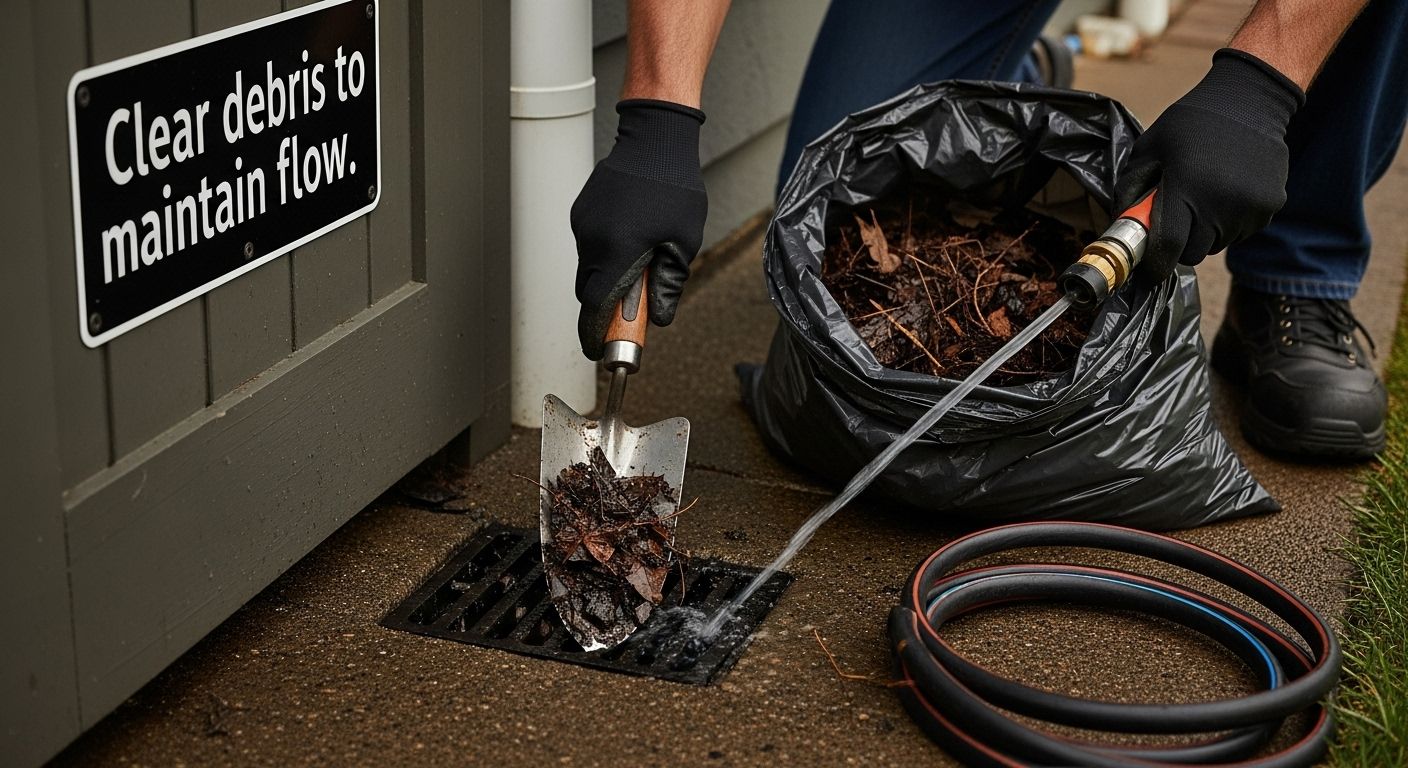
Step 2: Clear Debris and Clean the Drainage Area
Clearing debris and maintaining a clean drainage area is crucial for preventing water buildup and potential damage to your property. This step requires careful attention and the right approach to ensure your outdoor drainage systems remain functional and efficient.
Essential Tools and Safety Preparation
Before starting your drainage area cleaning, gather the necessary tools to make the process smooth and safe. You will need protective gloves, a sturdy rake or garden trowel, a large garbage bag, and potentially a pressure washer or garden hose. Wear closed-toe shoes to protect your feet from sharp debris or potential hidden hazards around drain openings. Work systematically by starting at the drain entrance and gradually moving outward, carefully removing all visible organic materials like leaves, twigs, grass clippings, and accumulated sediment.
Here is a handy table summarizing the essential tools and materials you need to safely and effectively clear debris from your outdoor drains. Use this list to prepare before starting maintenance work.
| Tool/Material | Purpose | Safety/Care Tip |
|---|---|---|
| Protective gloves | Protect hands from debris, sharp objects, and contaminants | Always wear before starting |
| Rake or garden trowel | Remove leaves, twigs, and accumulated debris | Use gentle motions to avoid damage |
| Large garbage bag | Collect and dispose of removed materials | Do not overfill or tear |
| Pressure washer/garden hose | Rinse and clean the drainage area | Start on low pressure setting |
| Closed-toe shoes | Protect feet from sharp debris and hidden hazards | Wear throughout the process |
| Soft-bristled brush | Loosen compacted debris without damaging grates | Use for stubborn debris |
Take extra care when removing debris from drain grates or covers. Some drainage systems might have delicate components that can be damaged by aggressive cleaning techniques. Use gentle motions with your rake or trowel to lift and remove materials without causing structural damage. If the debris seems compacted or difficult to remove, consider using a soft-bristled brush to loosen materials before collecting them.
Thorough Cleaning and Maintenance Techniques
After manually removing loose debris, rinse the drainage area thoroughly using a garden hose or pressure washer. Start with a low-pressure setting to avoid damaging the drain structure or pushing debris further into the system. Pay attention to how water flows during this process water should move quickly and smoothly without pooling or backing up. If you notice slow drainage or unusual water movement, this might indicate a more significant blockage that requires professional intervention.
Learn more about professional drain maintenance techniques to understand when you might need expert assistance. Some drainage issues are complex and might require specialized equipment or expertise.
Once you have completed cleaning, do a final visual inspection to confirm all debris has been removed and drainage pathways are clear. Proper maintenance at this stage can prevent costly water damage and ensure your outdoor drainage system remains functional throughout the year.
Step 3: Assess and Repair Visible Damage
Assessing and repairing visible damage to your outdoor drainage system is a critical step in maintaining its long-term functionality and preventing more extensive water-related problems. Damage can manifest in various forms, from small cracks to significant structural issues that compromise your entire drainage network.
Comprehensive Visual Damage Inspection
Begin your damage assessment by carefully examining every component of your outdoor drainage system under good lighting conditions. Look for specific signs of wear and deterioration such as hairline cracks, rust spots, loose connections, or areas where drainage materials have separated. Pay special attention to concrete or metal drain covers, pipe connections, and the surrounding ground areas. Use a bright flashlight to illuminate hard-to-see areas and consider using a small mirror to view angles that are typically difficult to inspect directly.
During your inspection, document any damage you discover by taking clear photographs. These images can serve as valuable references for future maintenance or when consulting professional plumbing services. Some damage might appear minor but could indicate more significant underlying issues that require immediate attention. Hairline cracks in concrete drainage structures, for instance, can quickly expand and compromise the entire drainage system if left unaddressed.
Repair Strategies and Considerations
Small repairs can often be handled as a do-it-yourself project, but knowing your limits is crucial. For minor concrete cracks, use specialized waterproof masonry sealants that can effectively prevent water infiltration. Plastic or metal drain components with minor damage might be repairable using appropriate sealants or replacement parts. However, significant structural damage or extensive deterioration should prompt a consultation with professional plumbing experts.
Discover professional drainage repair techniques to understand when a DIY approach might not be sufficient. Some drainage issues require specialized equipment and expertise that goes beyond typical homeowner maintenance capabilities.
After completing repairs, conduct a water flow test to verify the effectiveness of your maintenance. Run water through the drainage system and observe how it moves, checking for smooth flow and absence of leaks. A successful repair should restore your drainage system to optimal performance, preventing potential water damage and ensuring long-term functionality.
Step 4: Test Drainage Efficiency After Maintenance
Testing drainage efficiency is the critical final step in ensuring your outdoor drain maintenance efforts have been successful. This verification process helps confirm that all previous cleaning and repair work has restored your drainage system to optimal performance and prevents potential future water-related issues.
Systematic Water Flow Evaluation
To effectively test your drainage system, you will need a garden hose and approximately 15-20 minutes of uninterrupted time. Begin by simulating rainfall conditions by gradually introducing water into your drainage areas. Start with a moderate water flow and observe how quickly and smoothly water moves through the drain openings. Pay close attention to water movement speed, looking for any signs of hesitation, pooling, or backup that might indicate lingering blockages or structural problems.
Move the water stream systematically across different drainage points, watching for consistent water displacement. A well-functioning drainage system should allow water to flow freely without creating standing pools or showing signs of overwhelming the drainage capacity. Listen carefully for any unusual gurgling sounds or observe any unexpected water redirection, as these could signal underlying issues that were not addressed during earlier maintenance steps.
Advanced Diagnostic Techniques
For a more comprehensive assessment, consider using different water volumes to stress test your drainage system. Start with a light stream and gradually increase water pressure to simulate varying rainfall intensities. This method helps reveal potential weaknesses in your drainage infrastructure that might not be apparent during initial testing. Watch for warning signs such as water backing up, slow drainage, or unexpected water movement around drain perimeters.
Learn about professional drainage assessment techniques to understand when your home drainage system might require expert intervention. Some nuanced drainage issues can be challenging to diagnose without specialized equipment.
Successful drainage testing means water moves quickly and completely away from your property without any lingering moisture or unexpected water accumulation. If you notice persistent issues during your test, it may be time to consult a professional plumbing service to conduct a more thorough evaluation and provide targeted solutions.
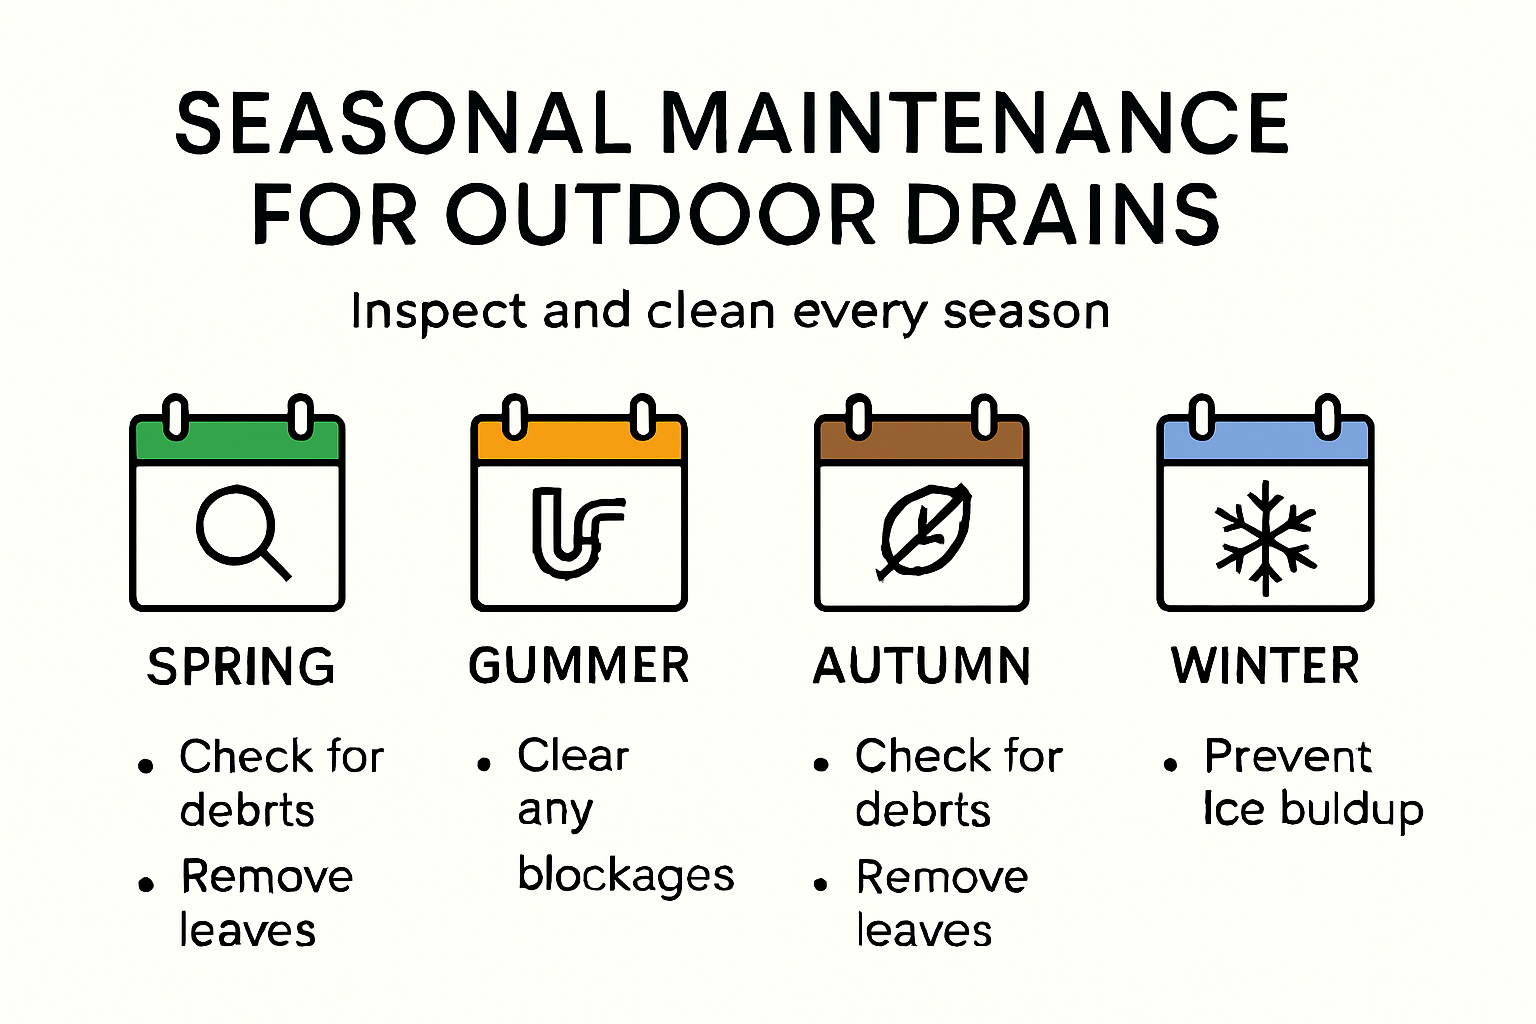
Step 5: Establish a Routine Maintenance Schedule
Establishing a consistent routine maintenance schedule is the key to preventing long-term drainage issues and protecting your property from potential water damage. A well-planned maintenance strategy transforms reactive repairs into proactive care, ultimately saving you time, money, and potential headaches.
Seasonal Maintenance Planning
Develop a comprehensive maintenance calendar that aligns with your local seasonal patterns. In regions with significant rainfall or heavy leaf fall, plan more frequent inspections during autumn and early winter. Divide your maintenance tasks into quarterly checkpoints, with specific focus areas for each season. Spring provides an excellent opportunity for thorough post-winter assessments, while summer offers ideal conditions for more extensive drainage system repairs and cleaning.
Consider creating a digital or physical maintenance log to track your drainage system’s condition. Document each inspection, noting any repairs, observed issues, or potential concerns. This systematic approach helps you identify emerging patterns and anticipate potential problems before they escalate. Keep your maintenance records organized and easily accessible, which can also be valuable if you need to consult professional plumbing services in the future.
Strategic Maintenance Frequency and Techniques
Typically, outdoor drainage systems require comprehensive inspections at least twice annually complemented by quarterly quick checks. During your primary inspections, perform a complete drainage system evaluation including debris removal, structural assessment, and efficiency testing. Intermediate quarterly checks should focus on quick visual assessments and minor maintenance tasks. Adjust your maintenance frequency based on your specific environmental conditions such as proximity to trees, local rainfall patterns, and your property’s unique drainage characteristics.
Explore our comprehensive home plumbing maintenance guide to understand more nuanced maintenance strategies tailored to your specific needs. Professional insights can help you refine your maintenance approach and identify potential issues early.
Successful routine maintenance is about consistency and attention to detail. Set reminders on your phone, mark calendar dates, or use maintenance tracking apps to ensure you never miss a critical inspection. By dedicating a few hours each season to your drainage system, you can prevent costly repairs and maintain optimal water flow around your property.
Turn Drain Headaches Into Lasting Home Protection with Legacy Plumbing & Drain Inc
Tired of unexpected water pooling or concerned about hidden blockages harming your property? You have already learned the importance of regular drain inspections, debris removal, and testing for efficiency from our maintenance tips. But even with your best effort, complex drain problems and stubborn blockages can still threaten your home and peace of mind. Protect your investment and avoid costly repairs by taking the next smart step.
Let Sacramento’s drainage specialists take over where DIY leaves off. Experience fast relief and dependable results when you book a personalized service with Legacy Plumbing & Drain Inc. Our expert technicians are available 24/7 to solve urgent drainage troubles and provide advanced outdoor solutions. See why homeowners trust us for quality service by discovering more about our professional drainage maintenance and repair options. Secure your home’s drains before the next storm hits—schedule your service now for complete peace of mind.
Frequently Asked Questions
How can I inspect my outdoor drains for blockages?
Start by walking around your property and visually examining all drainage points for standing water or debris. Use a flashlight to inspect darker areas and a stick to probe around drain openings for concentrated debris. Avoid putting your hands directly into the drains to prevent injury.
What tools do I need to clear debris from outdoor drains?
You’ll need protective gloves, a rake or garden trowel, a large garbage bag, and possibly a garden hose or pressure washer. Make sure to wear closed-toe shoes for protection while cleaning.
How do I assess visible damage in my outdoor drainage system?
Carefully examine the components of your drainage system for signs of wear, such as cracks, rust, or loose connections. Use a flashlight and possibly a mirror for hard-to-see angles. Document any damage with photographs for future reference.
What should I include in my routine maintenance schedule for outdoor drains?
Create a maintenance calendar that includes comprehensive inspections at least twice a year, with quick checks quarterly. Focus on inspecting for blockages, assessing structural integrity, cleaning debris, and testing drainage efficiency based on local environmental conditions.
To help you plan and track your ongoing outdoor drain care, here is a table outlining recommended routine maintenance tasks, their frequency, and the key focus for each. Use this as a checklist to ensure nothing gets missed throughout the year.
| Task | Recommended Frequency | Key Focus |
|---|---|---|
| Comprehensive inspection | Twice a year (spring/fall) | Blockages, structural integrity |
| Quick visual check | Quarterly | Debris, standing water |
| Debris removal | Quarterly or as needed | Leaves, twigs, organic buildup |
| Efficiency testing | At least twice a year | Water flow, backups, pooling |
| Documenting maintenance | Every inspection | Noting repairs, issues, photos |
Recommended
-
[
Dog Safety Outdoors: Essential Tips for 2025
– iPupPee](https://ipuppee.com/blogs/news/dog-safety-outdoors-essential-tips-2025)