
Slab leaks often develop quietly beneath Sacramento homes, leading to sudden water bill spikes and costly structural damage before homeowners even notice. Recognizing early warning signs is crucial, as these hidden leaks can threaten your foundation and expose your family to health hazards like mold. This guide walks you through practical steps to spot, address, and repair slab leaks quickly, safeguarding your property and restoring peace of mind.
Table of Contents
- Step 1: Identify Warning Signs of Slab Leaks
- Step 2: Shut Off Water and Prepare the Area
- Step 3: Locate the Exact Source of the Leak
- Step 4: Repair or Replace Damaged Piping
- Step 5: Verify Repairs and Restore Home Safety
Quick Summary
| Key Insight | Explanation |
|---|---|
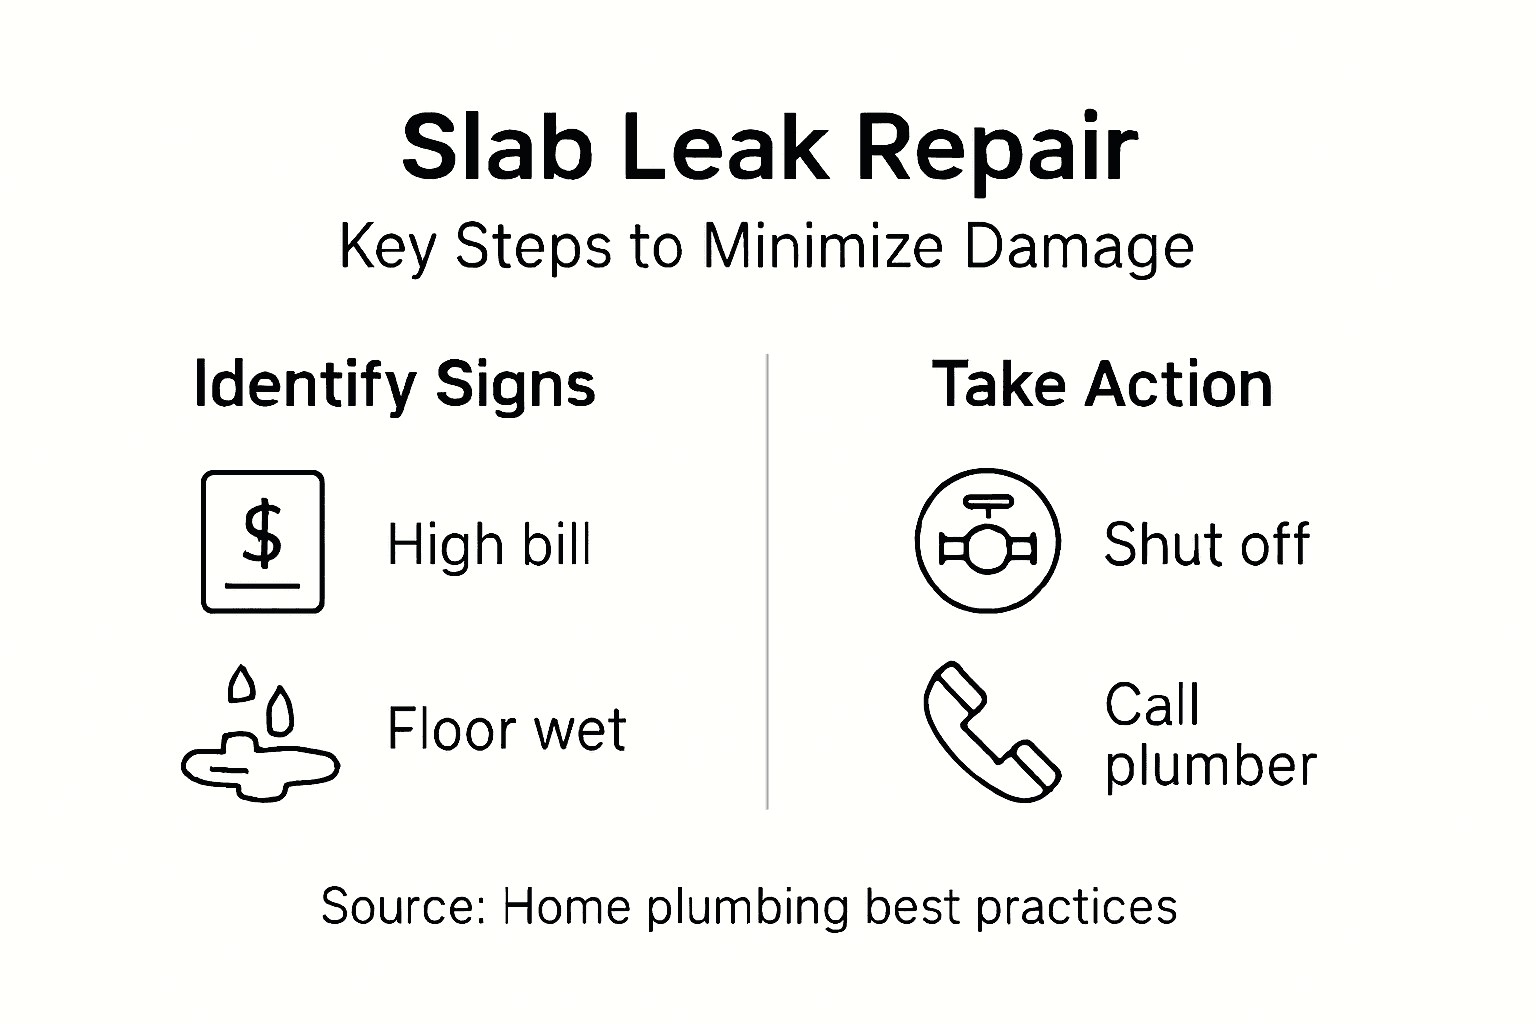
| 1. Monitor your water bill regularly | An unexplained increase in your water bill can signal a slab leak brewing beneath your foundation. |
| 2. Identify signs of leaks early | Look for damp spots, warm areas on flooring, and mold growth, as these can indicate a leak. |
| 3. Shut off water immediately | Locate and operate your main shut-off valve to halt water flow and prevent further damage. |
| 4. Use professional detection methods | Rely on professionals to accurately locate the leak using techniques like acoustic detection and infrared imaging. |
| 5. Verify repairs before restoring water | After repairs, check your water meter to confirm the leak is stopped and watch for future issues. |
Step 1: Identify Warning Signs of Slab Leaks
Slab leaks develop silently beneath your home’s concrete foundation, often causing serious damage before you even notice them. Learning to spot the early warning signs is your best defense against expensive repairs and structural problems. Let’s walk through the key indicators that suggest a slab leak is developing under your home.
The most obvious clue is an unexplained spike in your water bill. If your monthly charges jump significantly without changes in water usage, a hidden leak is likely the culprit. Check your water meter before and after a two-hour period when no one is using water—if it moves, water is escaping somewhere.
Listen closely to your plumbing system. Hearing running water sounds when all taps are off is a red flag that water is flowing where it shouldn’t be. This noise often occurs near walls or in the foundation area and typically happens at night when the house is quiet.
Visually inspect your home’s foundation and flooring for these telltale signs:
- Damp spots or wet patches appearing on floors, especially in consistent locations
- Warm spots on tile or concrete indicating hot water line leaks below the surface
- Cracks in your foundation or walls that seem to be expanding
- Mold or mildew growth in unusual places, particularly near baseboards
- Buckled or warped flooring caused by moisture damage beneath the surface
Causes like corrosion, poor installation, or external pressure can trigger slab leaks, making them surprisingly common in older Sacramento homes. The longer a leak goes undetected, the more structural damage accumulates, potentially compromising your foundation’s integrity.
Early detection prevents costly damage and health hazards like mold growth that can affect your family’s wellbeing.
If you notice any of these signs, don’t wait. Contact a professional immediately to confirm whether you have a slab leak. Professional detection equipment can pinpoint the exact location without guessing.
Pro tip: Document any unusual signs with photos and note when they first appeared—this information helps plumbers diagnose the problem faster and determine if the leak is active or dormant.
Step 2: Shut Off Water and Prepare the Area
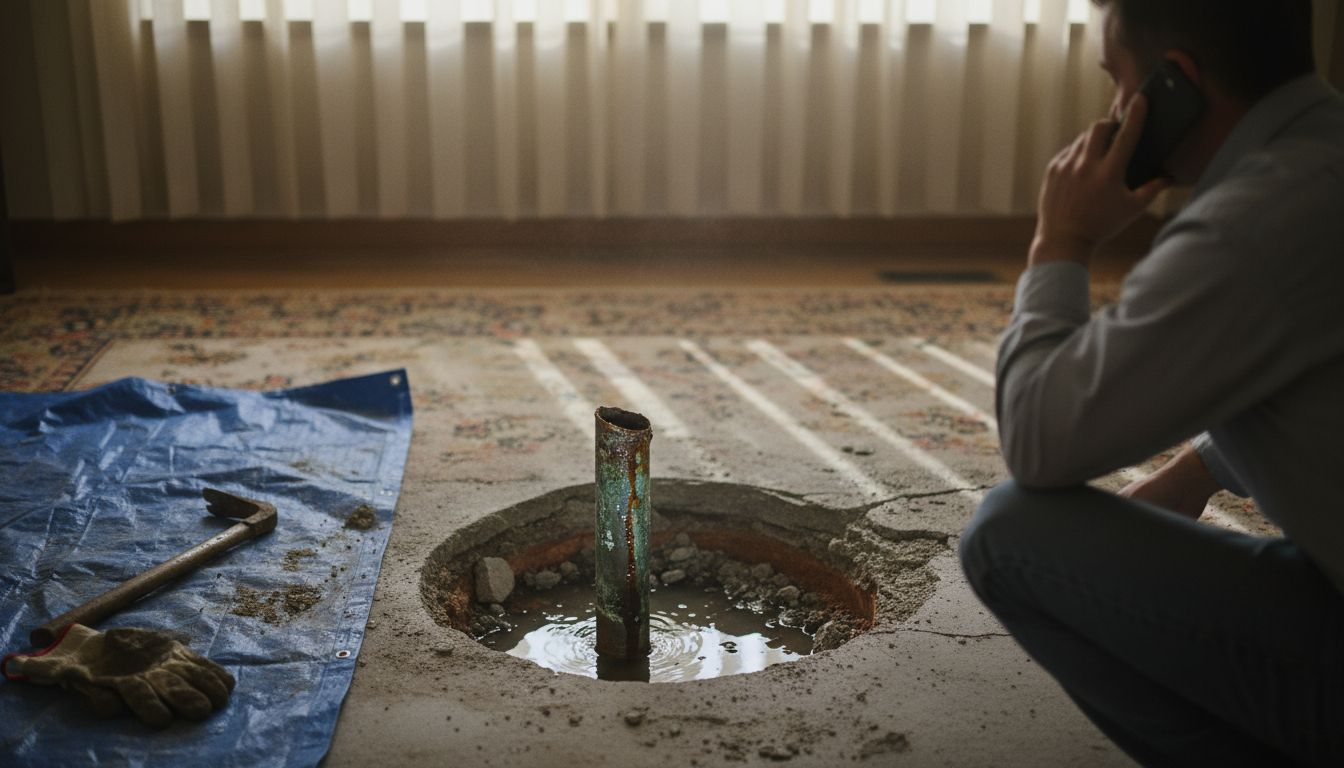
Once you’ve confirmed a slab leak, your next move is critical: stop the water flow immediately to prevent additional damage beneath your foundation. This step protects your home from escalating structural problems while you arrange professional repairs.
Your first priority is locating your home’s main water shut-off valve. This valve typically sits in your basement, garage, crawl space, or near the foundation wall where the water line enters your home. Take time now to locate it before an emergency strikes—you don’t want to search frantically when water is flowing where it shouldn’t be.
Once you find the valve, turn it clockwise to stop water flow. You should feel resistance as the valve tightens. If you can’t locate a main shut-off valve in your home, contact your water provider to have them shut off water at the street level.
After the water is off, take these steps to drain remaining water in your system:
- Open all faucets throughout your home, including outdoor spigots
- Flush every toilet to empty the tanks and lines
- Leave faucets open until water stops flowing completely
Now prepare the affected area to prevent additional damage. Remove valuables, protect flooring with tarps or plastic, and air out rooms to reduce moisture and prevent mold growth. Open windows and doors where safe to increase ventilation throughout your home.
Proper water shut-off and drainage prevents flooding from spreading while you wait for professional assessment and repairs.
Don’t turn the water back on yourself. Wait for a licensed plumber to inspect the leak, locate the damage, and determine the best repair approach. Turning water back on prematurely can worsen the problem.
Pro tip: Mark your main shut-off valve location with bright tape or paint, and teach all household members how to operate it—quick action during an actual emergency could save thousands in water damage.
Step 3: Locate the Exact Source of the Leak
Finding precisely where water is escaping beneath your foundation is crucial for planning repairs and understanding the scope of damage. You cannot fix what you cannot locate, so this step determines your repair strategy and final costs.
Do not attempt to excavate your entire foundation hoping to stumble upon the leak. This approach wastes time, money, and causes unnecessary property damage. Instead, professionals use specialized detection methods to pinpoint the exact location.
The most effective detection techniques include:
- Acoustic leak detection identifies sound patterns from escaping water
- Infrared thermal imaging reveals temperature variations caused by flowing water
- Hydrostatic testing pressurizes lines to isolate problem sections
- Soil excavation conducted only after pinpointing the leak location
Specialized methods such as acoustic leak detection, infrared thermal imaging, and hydrostatic testing collectively aid in accurately identifying leak locations. These advanced tools improve detection accuracy while minimizing property disruption and repair costs.
Here’s a quick comparison of slab leak detection methods and their strengths:
| Detection Method | Best For | Accuracy | Property Impact |
|---|---|---|---|
| Acoustic Leak Detection | Locating leaks via sound patterns | High | Minimal disturbance |
| Infrared Thermal Imaging | Revealing hidden hot water leaks | Very High | Non-invasive |
| Hydrostatic Testing | Isolating pipe sections | Moderate | Requires some access |
| Soil Excavation | Confirming after detection | Precise at source | Disruptive, limited use |
Your plumber will arrive with professional equipment and experience. Let them handle the detection work—attempting DIY methods often causes more problems than it solves. Professional plumbers in Sacramento have invested in quality detection tools that pinpoint leaks within inches of their actual location.
Advanced detection technology prevents expensive guesswork and protects your foundation from unnecessary excavation damage.
Once your plumber identifies the leak source, they’ll discuss repair options specific to your situation. Some leaks require full pipe replacement, while others allow for targeted repairs or rerouting. The location determines your options.
Pro tip: Ask your plumber to provide photos or video documentation of the leak location and detection method used—this creates a record for insurance claims and helps you understand exactly what repair work is needed.
Step 4: Repair or Replace Damaged Piping
Now that you know where the leak is located, your plumber will assess the damage and determine whether repair or replacement makes more sense. This decision affects your timeline, budget, and long-term home stability.
Your plumber evaluates three key factors: the pipe material, the extent of damage, and what caused the leak. A pinhole leak in a newer copper line might be repairable, while extensive corrosion in an older galvanized steel line typically requires full replacement.
Damaged pipes may require repair or replacement depending on pipe material, extent of damage, and leak cause. Understanding your options helps you make informed decisions about your home’s future.
Repair options include temporary and permanent solutions:
- Pipe patching seals small holes but works best on minor damage
- Epoxy coating creates a protective layer inside existing pipes
- Pipe rerouting bypasses the damaged section entirely with new piping
- Full replacement removes old pipes and installs new ones throughout affected areas
Temporary fixes like patching might seem cost-effective upfront, but they rarely last. Your plumber will likely recommend solutions that address the root cause, not just the symptom.
Replacement becomes necessary when corrosion is widespread or when the pipe material is failing throughout your system. This prevents recurring leaks and protects your foundation from future water damage.
Here’s a summary of slab leak repair options and when they’re recommended:
| Solution | Best Use Case | Durability | Cost Implication |
|---|---|---|---|
| Pipe Patching | Minor pinhole leaks | Temporary | Lower initial expense |
| Epoxy Coating | Inside pipes with minor damage | Long-lasting | Moderate investment |
| Pipe Rerouting | Damaged sections only | Permanent | Higher for rerouting |
| Full Replacement | Widespread corrosion | Permanent | Highest total cost |
Permanent solutions prevent further structural damage and mold issues that temporary patches cannot address.
Your plumber should explain each option clearly, including costs and expected lifespan. Ask about warranty coverage on repairs or replacements. A reputable plumber in Sacramento stands behind their work.
Pro tip: Request a written estimate that itemizes materials, labor, and timeline before work begins—this protects you and ensures no surprise charges appear when the job is complete.
Step 5: Verify Repairs and Restore Home Safety
Repairs are complete, but you’re not finished yet. Verifying that the work actually stopped the leak is essential before you can rest easy. This final step confirms your home is protected and water damage won’t continue.
Your plumber should turn the main water supply back on and run a final inspection. However, you can perform your own verification using a simple tool you already have at home: your water meter.
Use the water meter to confirm that repairs have stopped leaks by monitoring for continuous flow when water is off inside the home. A stationary meter indicates leaks have been fixed successfully.
Here’s how to check:
- Turn off all water-using appliances and ensure no one uses water inside the home
- Locate your water meter and note the current reading
- Wait two hours without using any water
- Check the meter again—if the reading hasn’t changed, the leak is fixed
- If the meter moved, water is still escaping somewhere
Once repairs are verified, focus on restoring your home. Address any water damage by drying affected areas thoroughly and monitoring for mold growth. Open windows, run dehumidifiers, and remove wet materials to prevent mold from developing in hidden spaces.
Inspect your foundation and flooring for lingering moisture. Dampness beneath your home can lead to mold, structural issues, and health problems for your family.
Verified repairs combined with thorough drying and monitoring protect your foundation and ensure long-term home safety.
Document everything in writing: the leak location, repair method used, completion date, and warranty information. Keep receipts and photographs for insurance purposes.
Pro tip: Schedule a follow-up inspection with your plumber three to six months after repairs to verify the fix has held—this catches any recurring issues before they become major problems.
Protect Your Home From Costly Slab Leak Damage Today
Slab leaks can silently undermine your home’s foundation leading to expensive repairs and health hazards like mold growth. If you’ve noticed warning signs such as unexpected water bills or damp spots, acting quickly is vital to prevent further damage and restore your home’s safety. At Legacy Plumbing & Drain Inc, we specialize in expert slab leak detection and repair with advanced technology to pinpoint leaks accurately and fix them efficiently.

Don’t wait until minor leaks turn into major problems that threaten your foundation. Trust Sacramento’s emergency plumbers who are ready 24/7 to provide professional service tailored to your needs. Learn more about our comprehensive plumbing and drainage solutions at Legacy Plumbing & Drain Inc. Take the first step toward lasting peace of mind by contacting us now for a thorough inspection and trusted repairs.
Frequently Asked Questions
How can I identify the warning signs of a slab leak?
To identify the warning signs of a slab leak, look for signs such as an unexplained spike in your water bill, unusual sounds of running water when all taps are off, and visible damp spots or cracks in your foundation. Document these signs to help professionals diagnose the issue.
What immediate actions should I take once I confirm a slab leak?
Once you confirm a slab leak, shut off your main water supply immediately to prevent further damage. Locate your main shut-off valve, turn it clockwise to stop the water flow, and then follow with draining taps and toilets to clear remaining water from your system.
How do professionals locate the exact source of a slab leak?
Professionals use specialized detection methods such as acoustic leak detection, infrared thermal imaging, and hydrostatic testing to identify the exact source of a slab leak. These techniques minimize damage to your property and provide accurate locations, allowing for effective repairs.
What are my options for repairing or replacing damaged piping?
Your options depend on the extent of the damage and the type of piping involved. Common solutions include pipe patching for small leaks, epoxy coating for internal protection, and full pipe replacement for extensive corrosion. Consult with a plumber to determine the best option for your specific situation.
How can I verify that the repair has fixed the slab leak successfully?
To verify that the repair is effective, monitor your water meter for any changes after turning the main water supply back on and ensuring all water use is halted. If the water meter remains stationary after two hours, it indicates that the leak has been successfully repaired.
What steps should I take to prevent mold growth after a slab leak repair?
To prevent mold growth after a slab leak repair, thoroughly dry any affected areas and ensure proper ventilation in your home. Use dehumidifiers, open windows, and remove wet materials to maintain a dry environment, reducing the risk of mold development within 30–60 days.
Recommended
- What Is A Slab Leak? Sacramento Home Impact – Legacy Plumbing & Drain – Emergency Plumbers Of Sacramento
- How To Detect Slab Leaks: Guide For Sacramento Homeowners 2025 – Legacy Plumbing & Drain – Emergency Plumbers Of Sacramento
- How Slab Leaks Are Fixed: Fast Solutions For Sacramento Area Homes 2025 – Legacy Plumbing & Drain – Emergency Plumbers Of Sacramento
- Slab Leak Warning Signs Every Sacramento Homeowner Must Know (2025) – Legacy Plumbing & Drain – Emergency Plumbers Of Sacramento